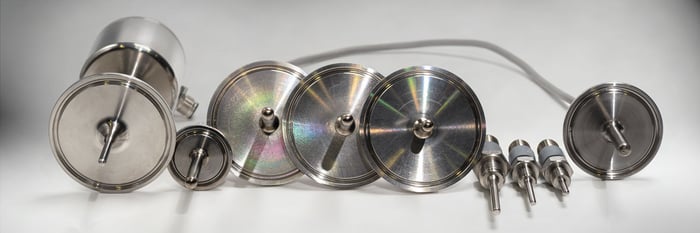
Sanitary temperature sensors are commonly used in many industries, such as Food and Beverage, Dairy, Pharmaceutical and Life-science. In this post I will take a look at what these sanitary temperature sensors are and how they differ from common temperature sensors.
The calibration of sanitary sensors is different and way more difficult than calibrating normal temperature sensors. In this blog post, I will be discussing the considerations that should be taken into account when calibrating these sensors; it is easy to make mistakes that will cause big errors in the calibration results.
So if you are calibrating sanitary temperature sensors, you should take a look at this blog post.
Sure, there is also some educational content for everybody interested in temperature calibration.
Let's dive in!
Download this article as a free pdf file >>
Table of content
What are sanitary temperature sensors?
Why sanitary sensors are difficult to calibrate?
- Sensors are very short
- Sensors often have a clamp connection with a flange
- Liquid bath pros and cons
- Dry-block pros and cons
How to calibrate in a temperature dry block
- Using a reference sensor
- Using internal reference sensor
- Using a dedicated short reference sensor
- Short sensor without a clamp connection
Documentation, metrological traceability, calibration uncertainty
Beamex solution for short sanitary sensor calibration
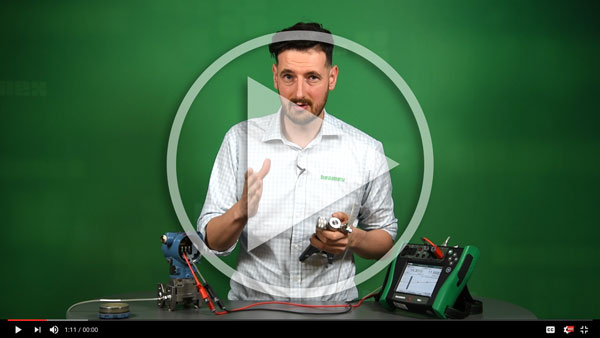
Before we get into the details, here's a short video appetizer on this topic:
What are sanitary temperature sensors?
Let’s start by shortly discussing what these sanitary temperature sensors are.
Temperature is one of the critical process parameters in many industries and the accurate temperature measurement in processes is a crucial consideration.
Food and Beverage, Dairy, Pharmaceutical and Life-science industries have additional requirements for the temperature measurement sensors because of their processes. They require temperature sensors that are “sanitary”, meaning that these sensors need to be suitable to be installed in hygienic and aseptic process environments.
These sensors need to be hygienic and designed to be easy to clean, often supporting the clean-in-place (CIP) process (cleaning without disassembly). The mechanical design needs to be free from any cavities, dead-pockets, gaps or anything that would complicate the hygienic cleaning.
Surface finishes of these sensors are hygienically graded and need to meet the strict standards in these industries, such as the 3-AR (https://www.3-a.org/) or EHEDG (European Hygienic Engineering & Design Group) https://www.ehedg.org/ .
The material of the wetted parts in these sensors is often high-grade stainless steel, suitable for these applications.
One very common feature in these sanitary temperature sensors is that they are typically very short. This makes the calibration way more difficult than with normal temperature sensors.
Another thing that makes the calibration difficult is the large metallic flange needed for the clamp installation.
The temperature ranges typically go up to around 150 °C (300 °F), or in some cases up to 200 °C (400 °F), so that is not very challenging.
More on these calibration challenges in the following chapters.

The role of calibration
In any industry, it is vital that the process measurements do measure correctly and as accurately as designed. This can be achieved with the help of suitable process instruments and with a proper calibration program.
Within the Food and Beverage, Pharmaceutical and Life-science industries, the calibration plays even more important role than most other industries. In these industries, the consequences of a bad or a failed calibration can have really dramatic effect, as we talk about consumer and patient health and safety. As failed calibration can be very costly in these industries, it has to be avoided by all means.
These industries also have dedicated strict regulations concerning calibration, such as various FDA regulations.
More generic information about calibration can be found in other articles in this blog and on the page What is Calibration?
Why sanitary sensors are difficult to calibrate?
Let’s discuss next why these sanitary sensors are difficult to calibrate.
1. Sensors are very short
As mentioned earlier, these sanitary temperature sensors are typically very short. Most often less than 100 mm (4 in), typically around 50 mm (2 in), but can also be as short as 25 mm (1 in).
The outer dimension of the sensor typically is 3 mm (1/8 in) or 6 mm (1/4 in).
The commonly used practice in temperature calibration (and an Euramet guideline recommendation) is that a temperature sensor should be immersed deep enough to achieve sufficient accuracy. The recommendation is to immerse into a depth that is 15 times the sensor diameter (plus the length of the sensor element). But with these short sanitary sensors, it is simply impossible to immerse the sensor into sufficient depth during the calibration, because the sensor is so short compared to the diameter.
For example, a typical sanitary sensor with a diameter of 6 mm (1/4 in) should be immersed (15 x 6 mm) into at least 90 mm (3.5 in) depth during the calibration, to ensure accurate results. But if that 6 mm (1/4 in) sensor has a length of only 50 mm (2 in), sufficient immersion is simply not possible.
When not immersed deep enough, additional error and uncertainty will be caused in the calibration.
On an earlier blog post, how to calibrate temperature sensors, our temperature calibration lab people gave these rules of thumb for the immersion depth (when calibrating in liquid bath):
- 1% accuracy - immerse 5 diameters + length of the actual sensing element inside the sensor
- 0.01% accuracy - immerse 10 diameters + length of the sensing element
- 0.0001% accuracy - immerse 15 diameters + length of the sensing element
The “accuracy” in the above rule is to be calculated from the temperature difference between the block temperature and the environment temperature.
Example: if the environment temperature is 20 °C and the block temperature is 120 °C, there is a 100 °C difference. If you then immerse the probe only 5 times the dimension (plus the sensing element length) – say you have 6 mm probe with a 10 mm sensing element inside of it - and you immerse it 40 mm (5 x diameter + sensing element) - you can expect about 1 °C error due to the low immersion (1% from 100 °C).
Picture: The below picture illustrates the commonly used relationship rule between thermometer immersion depth (in diameters) and the relative error of the temperature difference (of the temperature block and environment temperatures). So if you don't immerse at all, you naturally get a 100% error, and if you immerse deep enough the error caused by immersion becomes insignificant. Somewhere around where the immersion is 5 times the dimension, the error is about 1% of the temperature difference:
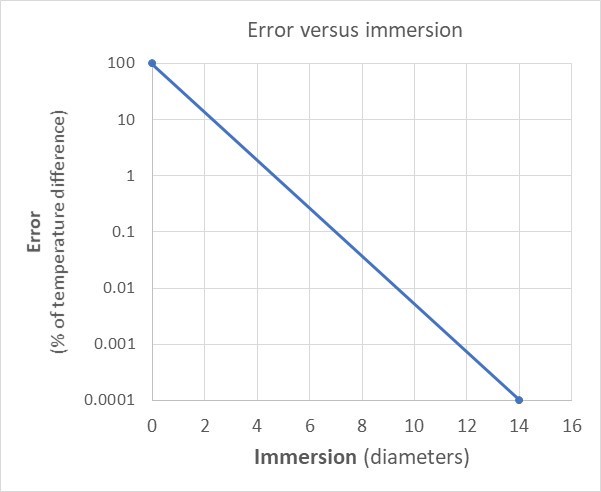
This rule of thumb can become quite significant at higher temperatures and/or for extremely short sensor lengths. So, keep this in mind with sensors less than 40 mm or 1-1/2 inches. Also, it may be worth having a conversation with a design engineer to figure out a way to increase the sensor length.
Naturally this accuracy limitation is valid also when the sensor is installed in the process and measuring the process temperature - being too short, the sensor is not able to accurately measure the process temperature!
It is not always easy to know the length of the actual sensing element inside the probe. If that is not mentioned in the datasheet, you can ask the manufacturer.
So how to calibrate these short sensors that can not be immersed deep enough?
This will be discussed in later chapters.
2. Sensors often have a clamp connection with a flange
As mentioned in the previous chapter, these sanitary sensors are too short compared to their diameter to enable a proper immersion causing temperature leaks, adding error and uncertainty to the calibration.
Like this would not be enough, these sensors also often have a so-called clamp connection (Tri-clamp, ISO 2852, DIN 11851, DIN 32676, BS 4825, Varivent, etc.) configuration, so there is a relatively large metallic flange, that is causing temperature to conduct / leak from the sensor to the flange. In practice, this temperature leak means that the temperature from the sensor is conducting to the large metallic flange, so the flange causes the sensor to read a bit of a lower temperature (when calibrating temperature higher than environment temperature).
This kind of flange makes the calibration more difficult is several ways:
First, the flange adds temperature leak from the sensor to the flange, the more the bigger the flange is, the more the bigger the temperature difference is to the environment temperature.
While at the same time the sensor is very short, this temperature leak causes the sensor to measure erroneous temperature.
Liquid bath or a dry-block?
Generally, you can calibrate temperature sensors in a liquid bath or in a dry-block. This is also the case with the sanitary temperature sensors.
Let’s discuss next what these are and what are the main pros and cons of both.
Liquid bath
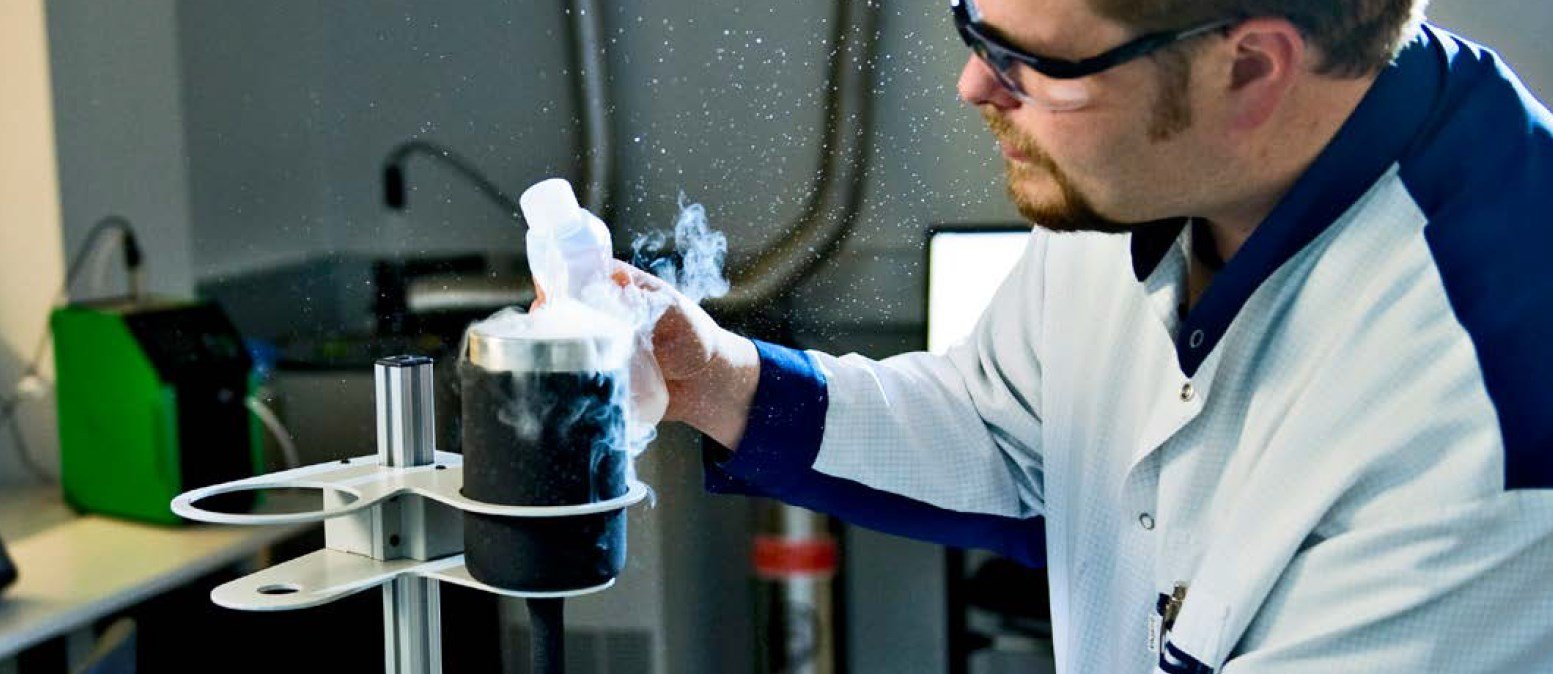
As the name suggests, a temperature liquid bath has liquid inside. The liquid is heated / cooled to the required temperature and the temperature sensors to be calibrated are inserted into the liquid. Often the liquid is stirred for even temperature in the liquid.
Liquid bath pros and cons
A liquid bath makes it easier to insert any shape of sensors in it and you can also use a reference probe inserted at the same time. Depending on the size of the liquid bath, you may insert several sensors to be calibrated at the same time. In case the sensor to be calibrated is an odd shape, a benefit is that it will still fit inside the liquid bath.
A liquid bath often enables better uniformity and accuracy than a dry-block due to better heat transfer of liquid.
So, this starts to sounds like a favorable option?
A liquid bath has anyhow several drawbacks as to why it is not always the best option:
- A liquid bath always includes some sort of liquid, such as silicone oil, and often you don’t want to contaminate the sanitary sensor in such a liquid. There is a lot of cleaning after the calibration to ensure that the sensor is clean when installed back into the process.
- Handling of hot oil is dangerous and any spills may cause injuries.
- Any oil spills make the floor very slippery and can cause accidents.
- Liquid baths are very slow. Even if it could fit several sensors in at the same time, it is often several times slower than a dry-block, so overall effectivity is not really any better. Sometimes people may have several baths, each set to different temperature, and they move the sensors manually between the baths to skip the waiting time of the bath to change temperature. This may work in a calibration laboratory but is naturally a very expensive way to calibrate.
- The sanitary sensor should be placed so that the surface of the liquid touches the bottom of the flange, but in practice this is not always that easy to do. For example silicon oil has pretty large thermal expansion, it means that the surface level is changing slightly as the temperature changes. So, you may need to adjust the height of the sanitary sensor during the calibration. Also, due to the stirring of the liquid, there are small waves on the surface and the liquid level is often deep in the bath, so it is difficult to see that the sensor is at the right depth.
- Liquid baths are often large, heavy and expensive equipment.
Dry-block
A temperature dry-block (or dry-well) is a device that can be heated and / or cooled to different temperature values, and as the name suggests, it is used dry, without any liquids.
Dry-block pros and cons
As the earlier chapter discussed the pro and cons of a liquid bath in this application, let’s look at the same also for the dry-block.
The main pros of calibrating the sanitary sensor in a dry-block include:
- As it is a dry, it is also clean and does not contaminate the sanitary sensor to be calibrated. Sure, the sensor should still be cleaned after calibration, but the cleaning is way easier than with a liquid bath.
- A dry-block is also a very fast to change temperature.
- When using a dedicated insert with proper drillings, it is easy to insert the sanitary sensor always the same way (no adjustments), and the calibration is repeatable every time and with different users.
- A dry-block is light and easy to carry compared to liquid bath.
- Typically, a dry-block is also cheaper than a liquid bath.
On the downside, a dry-block is a less accurate than a liquid bath, it typically only calibrates one sanitary sensor at a time and needs different inserts drilled for different diameter sensors.
Despite these downsides, customers often prefer to make the calibration of their short sanitary sensors in a dry-block.
So, let’s discuss next the different considerations when calibrating in a dry-block.
How to calibrate in a temperature dry block
To calibrate these short sanitary sensors in a temperature dry-block, there are a few considerations to take into account.
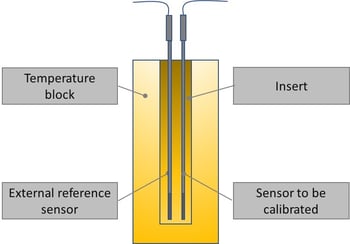
Using a reference sensor
Firstly, when you do the calibration in a temperature dry block, the flange of the sanitary sensor makes it impossible to use a normal external reference sensor in the same insert because it simply does not fit in, the flange covers the insert top and all the holes in the insert.
Picture: Comparing calibration of a normal (long, no flange) temperature sensor using a reference probe on the first picture, with a short sanitary sensor with a flange on the second one. We can see that the short sensor flange covers all the holes in the insert, so it is not possible to insert a normal reference temperature probe:
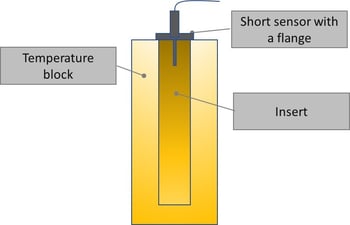
Using internal reference sensor
The dry-block always include an internal reference sensor. Trying to use the internal reference sensor in the dry-block just does not work, because the internal reference sensor is located close to the bottom of the temperature block, and the short sensor to be calibrated is located in the very top part of the insert. The dry-blocks typically control the temperature gradient on a limited range in the bottom of the insert. The top part of the insert typically has a larger temperature gradient, so the top of the insert does not have the same temperature as the bottom of the insert. The size of the gradient depends on the temperature difference between the insert and environment, and how deep you go in the insert.
Picture: The internal reference sensor is located in the bottom of the temperature block, while the short sanitary sensor is located in the very top part of the insert. There is a temperature gradient in the insert, causing the top of the insert being different temperature than the bottom. This is causing error in calibration:
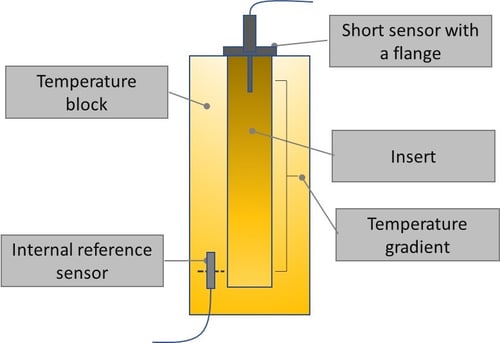
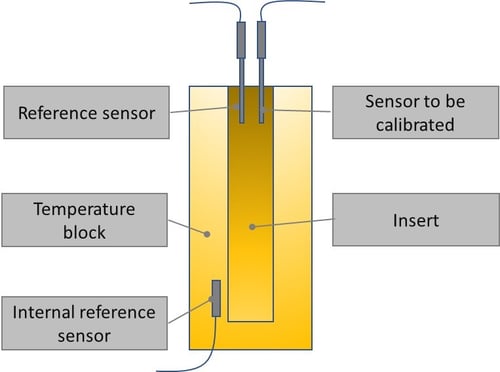
Using a dedicated short reference sensor
As the internal reference sensor in the bottom of the dry-block is not suitable, we need to use a dedicated external reference temperature sensor.
This reference sensor cannot anyhow be a normal long reference sensor, as discussed earlier.
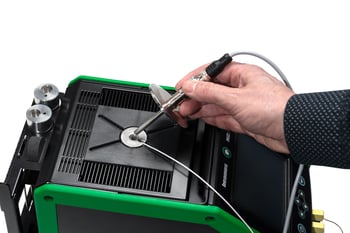
The solution is to use a dedicated reference sensor that is short enough so that it can be immersed into the same depth as the sanitary sensor to be calibrated. Optimally, the middle of the sensor elements should be aligned to the same depth.
Also, the reference sensor needs to have a thin flexible cable so that the cable can fit under the flange of the sanitary sensor. To help that, we can make a grove in the top of the insert where the reference sensor cable fits and the flange of the sanitary sensor still touches the top of the insert.
Naturally the structure of the temperature dry-block needs to be such that the sanitary sensor with the flange fits to its place and touches the insert top end (in some dry-blocks the surroundings are preventing the flange to go deep enough to touch the top of the insert).
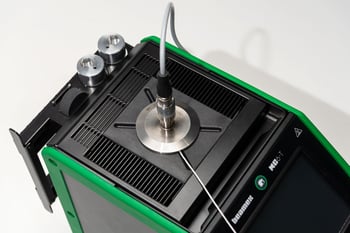
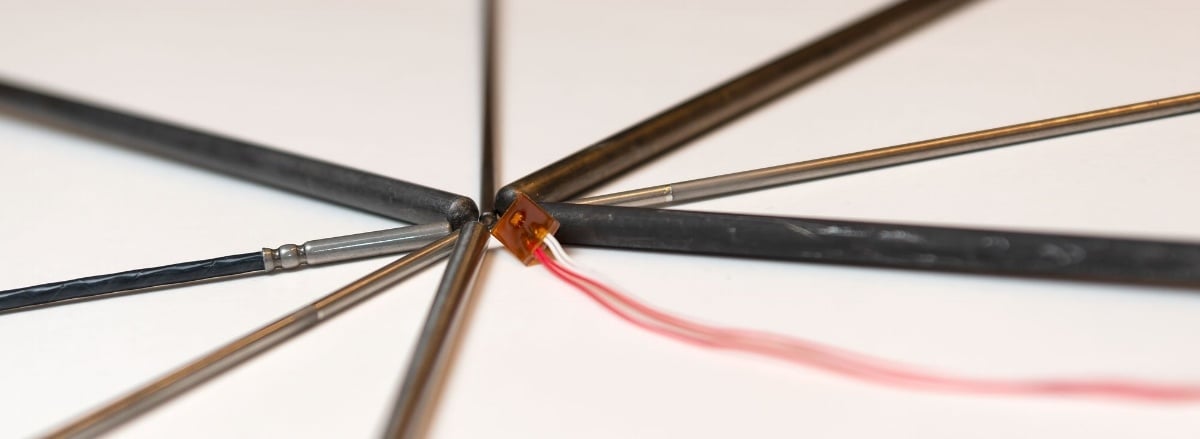
Picture: A dedicated short reference sensor is located at the same depth as the short sanitary sensor to be calibrated, ensuring they are measuring the exact same temperature. Also, the reference sensor cable is in the grove, so it does not prevent the flange of the sanitary sensor to touch the top of the insert:

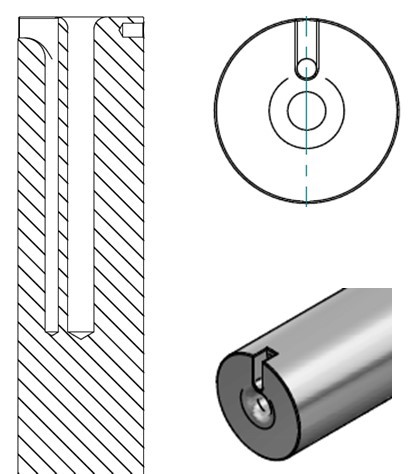
Picture: Some example pictures of how the dedicated insert for sanitary sensor calibration could look like. The hole for the sanitary sensor and for the reference sensor are equally deep and there is a grove where the ref sensor cable can go:
Short sensor without a clamp connection
There are also short temperature sensors without the clamp connection and without the flange. With these sensors you should use an external reference sensor that has been immersed to the same depth as the sensor to be calibrated. The reference sensor should be as similar as possible with the sensor to be calibrated (similar diameter, similar response time, etc.).
The internal sensor in the dry-block cannot be used here either since it is located in the bottom of the temperature block and does not measure the same temperature as the short sensor.
Picture: Calibrating a short sensor (without a flange) using a short reference sensor:
Download this article as a free pdf file by clicking the picture below:

Documentation, metrological traceability, calibration uncertainty
There are many additional things that are important in every calibration; as there are separate articles of many of these in this blog, I only briefly mention these here:
As documentation is included in the formal definition of calibration, it is a vital part of every calibration. This is naturally also valid in sanitary temperature sensor calibration. Typically, in the form of a calibration certificate.
The calibration equipment used should have a valid metrological traceability to the relevant standards, otherwise the calibration does not ensure traceability in the sensor calibration. More info on metrological traceability can be found here:
The calibration uncertainty is a vital part in every calibration. If the calibration equipment (and calibration method and process used) is not accurate enough for the sensor calibration, then the calibration does not make much sense. I mean, what’s the point to use a 2% accurate calibrator to calibrate a 1% accurate instrument.
Learn more about calibration uncertainty here:
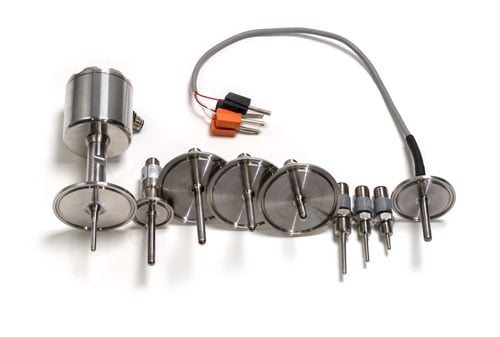
Beamex solution for short sanitary sensor calibration
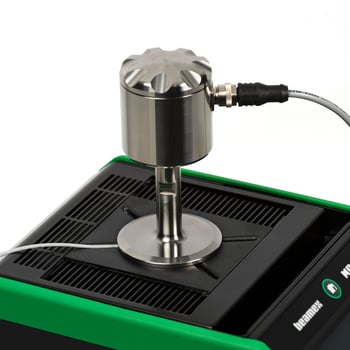
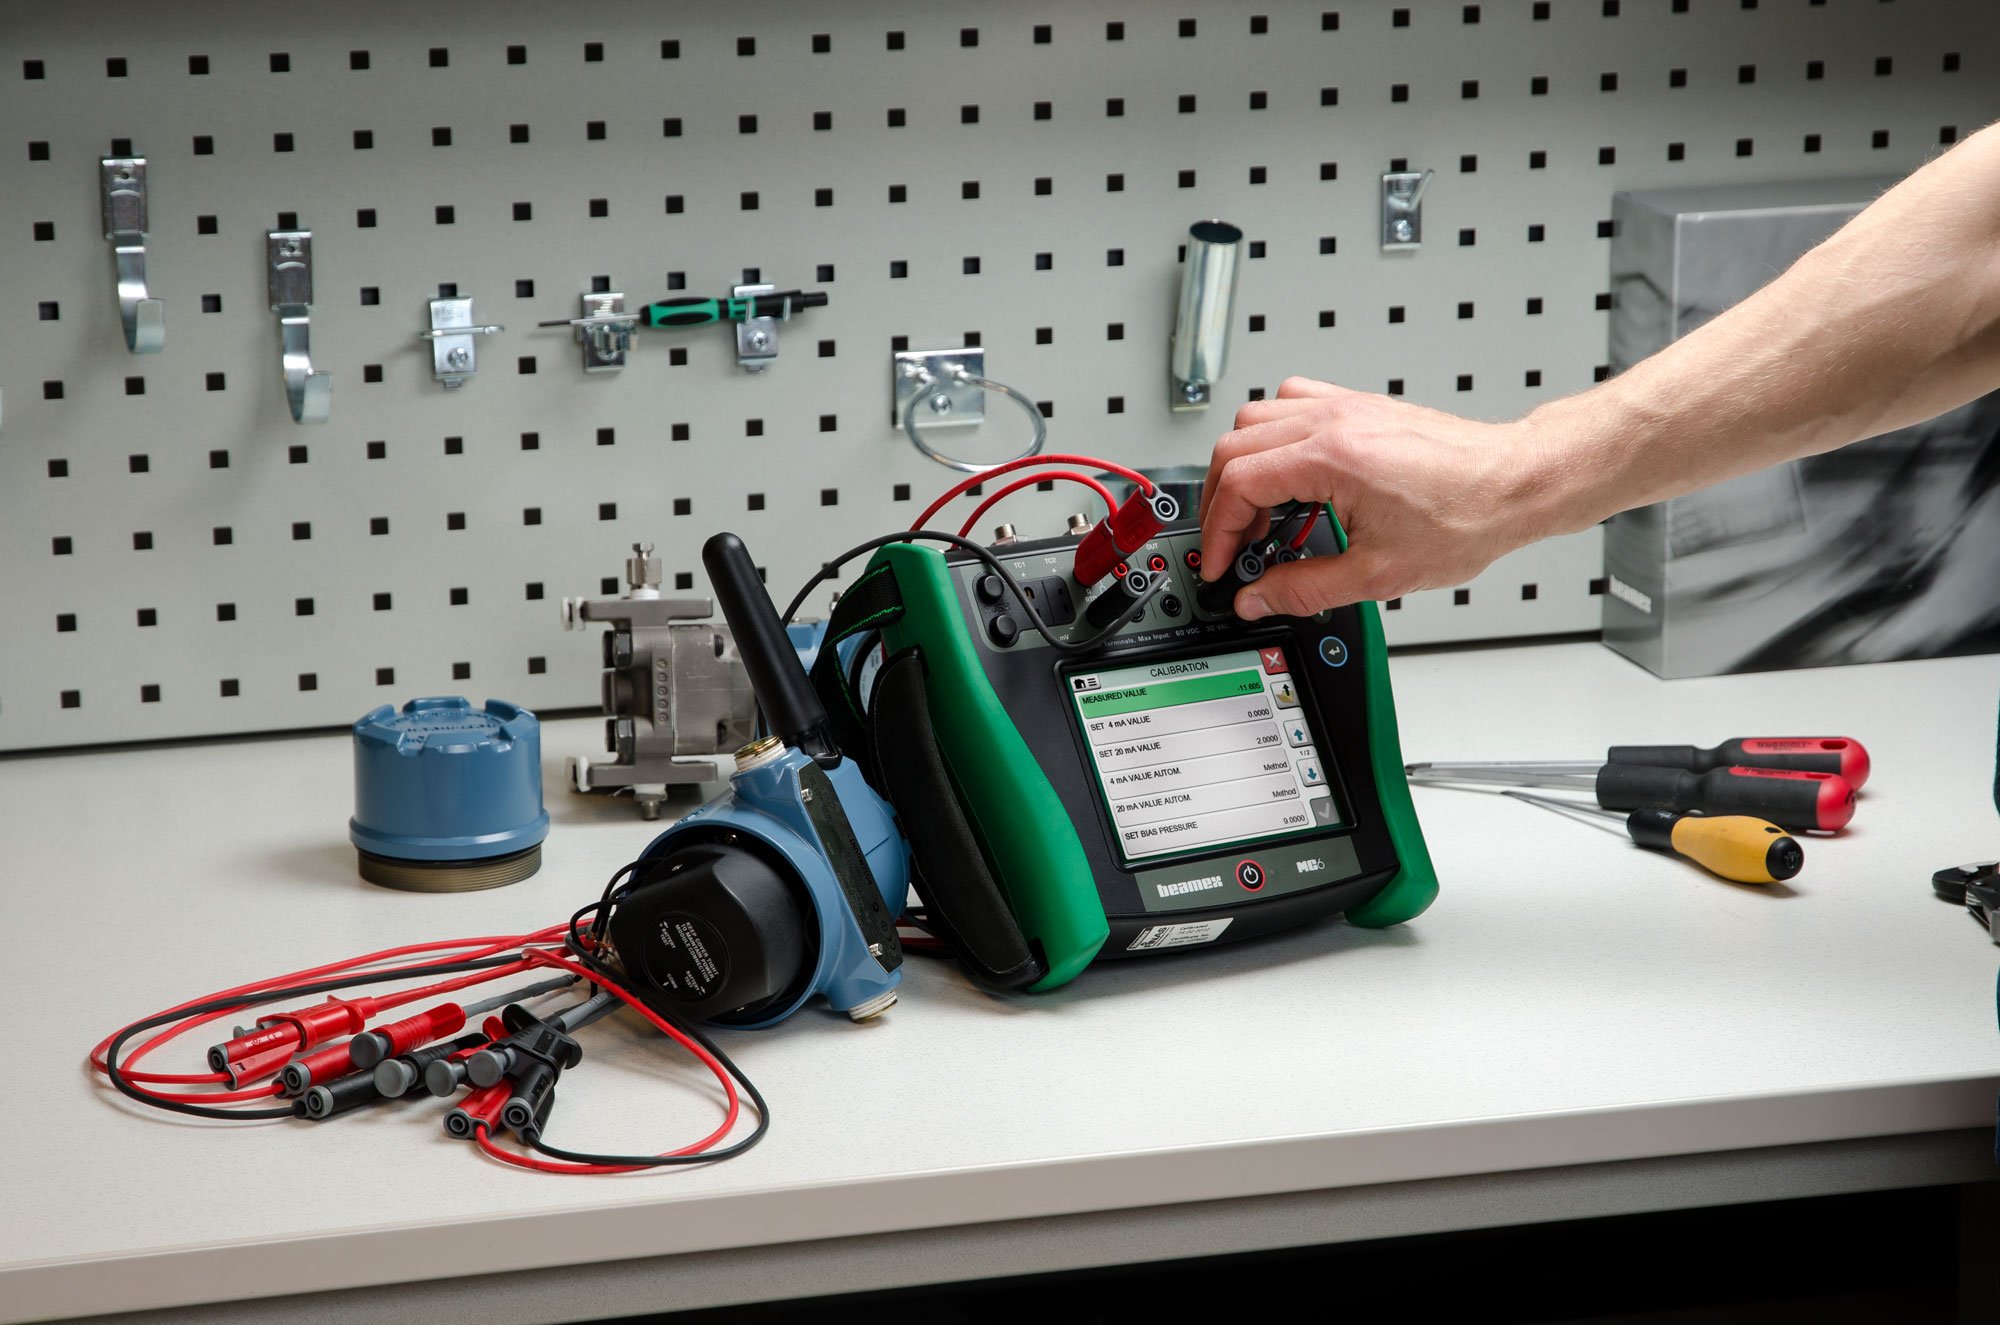
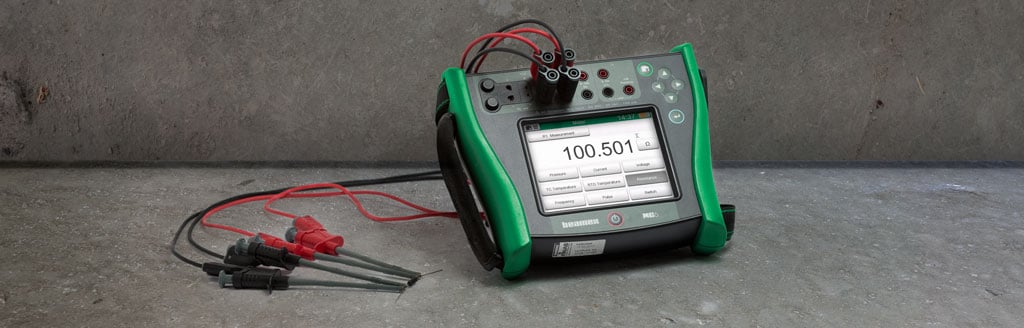
The Beamex MC6-T is an extremely versatile portable automated temperature calibration system. It combines a temperature dry-block with Beamex MC6 multifunction process calibrator and communicator technology.
The Beamex MC6-T150 temperature calibrator model is perfectly suited for the application of calibrating this kind of short sanitary temperature sensors. The MC6-T150 can be provided with custom inserts to match your specific sensors.
The Beamex SIRT-155 temperature sensor is a very short and accurate temperature sensor with a thin flexible cable, designed to be a perfect companion with the MC6-T150 for this application.
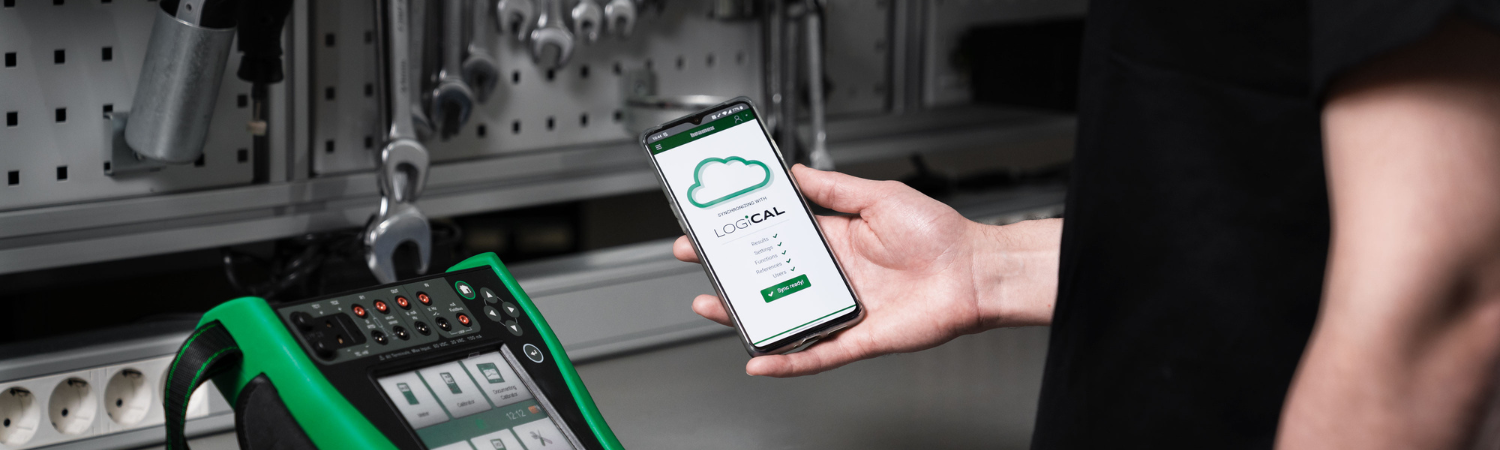
Using the MC6-T in conjunction with Beamex calibration software, CMX or LOGiCAL, enables you to digitize and streamline your whole calibration process.
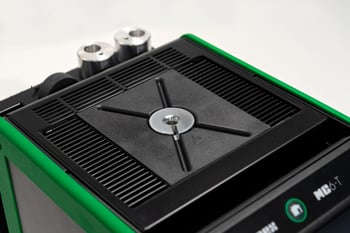
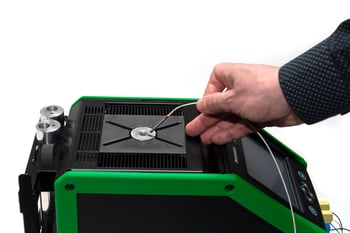
Pictures: In the first picture below we can see Beamex MC6-T with a dedicated insert for sanitary sensors calibration. The second picture shows how the short reference sensor (SIRT-155) is being installed. Third picture shows the sanitary sensor to be calibrated being installed. Finally, the fourth picture shows all installations being done and we are to start the automatic calibration:
In case you want to learn more, or to see a demonstration how to calibrate sanitary temperature sensors with Beamex solution, please feel free to contact us.
Fill the Contact Request Form or find our worldwide contacts.
Related blog posts
If you found this article interesting, you might also be interested in the following articles and eBooks:
- Temperature Calibration [eBook]
- How to calibrate temperature sensors
- Uncertainty components of a temperature calibration using a dry block
- Pt100 temperature sensor – useful things to know
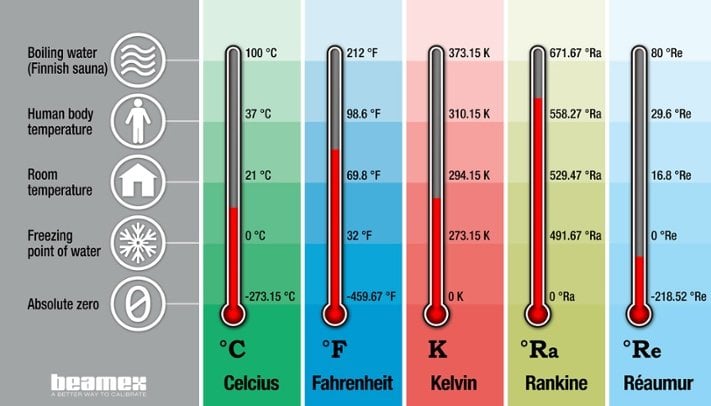
- Temperature units and temperature unit conversion
Feel free to ad comments or questions, share the article or suggest interesting topics for new blogs articles.
Thanks for taking the time to read!


.jpg)


Discussion