

In this article, I look at the practical considerations and the different tests you should perform when calibrating your weighing scales/instruments/balances.
Update February 2019: We made an educational video on weighing scale calibration, you can find that in this link:
Weighing Scale Calibration Video
Weighing scales, weighing instruments, weighing balances…
Different resources are using different terminology. I will be mainly using the term “weighing instrument” in this article.
Weighing instruments/scales/balances, are widely used in industry for various measurements. Some weighing instruments are small laboratory instruments measuring a few grams and are very accurate. While some industrial weighing instruments are very large ones that measure, for example, the mass of trucks. We all see weighing instruments in our everyday life around us, for instance, when we visit a grocery store and weigh vegetables.
As with any measurement instruments, weighing instruments should also be calibrated regularly to assure that they are measuring correctly and accurately. A proper metrologically traceable calibration is the only way to know how accurately weighing instruments are measuring.
Many weighing instruments are used for legal measurements or measurements used as the basis for the monetary transfer and these are part of a legal or statutory verification program based on legislation. Often the calibration of weighing instruments is based on a quality system (such as ISO9000), health care, traffic (air, marine) safety or forensic investigation.
There are dedicated regulations for weighing instruments and their calibration (EURAMET Calibration Guide, NIST Handbook 44, OIML); more on those later in the article.
In this article, the main focus is to look at the practical considerations and the different tests you should perform when calibrating your weighing instruments.
To download this article in as pdf file, please click the picture below:
Table of content
Calibrating weighing scales/instruments
1. Preparations before calibration
Here is a video on how to calibrate weighing scales:
Calibrating weighing scales/instruments

Let’s start by looking at some of the preparations you should make before the calibration and then look at the different tests you should be doing.
1. Preparations before calibration
Before you can start the calibration of the weighing instrument, you should clarify a few things and get prepared.
You should find out the technical characteristics of the weighing instrument (max weight, d value), the accuracy requirement (max error allowed and uncertainty) and what to do if the calibration fails (adjustment).
Typically, the whole measurement range is calibrated and the calibration is performed in the location where the instrument is being used. Make sure you have enough weights for the calibration procedure available.
The weighing instrument should be switched on at least 30 minutes before the calibration. The temperature of the weights should be stabilized to the same temperature where the calibration is to be done.
The weighing instrument should be at a horizontal level, especially for small and accurate weighing instruments. Perform a few pre-tests by placing weights close to the maximum of the range on the instrument and to ensure it works normally.
In case the weighing instrument fails in calibration and it is adjusted, you should make an “as found” calibration before adjustment and an “as left” calibration after adjustment.
Next, let’s take a look at the different tests that should be done during the calibration.
2. Eccentricity test
In normal use of a weighing instrument, the load is not always placed perfectly on the center of the load receptor. Sometimes the results of a weighing instrument can vary slightly depending on if the load is placed in different locations on the load receptor. In order to test how much effect the location of the load has, the eccentricity test is performed.
In the eccentricity test, the reference load is placed in a few different specified locations on the load receptor. First, the load is placed in the center of the load receptor (the load’s center of gravity) and the result is observed. Next, the load is placed in four different sectors of the load receptor, as illustrated in the picture below.

The above picture is for rectangular and round load receptors, but naturally, in practice, there are many different shapes of load receptors and the location of the load will vary. Standards OIML R76 and EN 45501 will give guidance for different load receptor shapes.
The calibration procedure should specify where to place the load during the test and calibration results (in certificate format) should also document the locations.
The test load used in an eccentricity test should be at least one-third (1/3) of the max load of the weighing instrument. The test should preferably be done using just one test load, if possible. That way it is easier to be sure that the load’s center of gravity is in the specified location. For a weighing instrument with multiple ranges, the eccentricity test should be done with the highest range.
As the aim of the eccentricity test is to find out the difference caused by the location of the load, it is not necessary to have an accurate calibrated load. It is naturally important to use the same load through the test.
If the eccentricity test is used also to determine the errors of the indication, then a calibrated load should be used.
Procedure for the eccentricity test
The indication is zeroed before the test. The test load is placed to location 1 and indication is recorded. The test load is then moved to locations 2 to 5 and indication is recorded in each location. Finally, the test load is placed again to location 1 to check that the indication has not drifted from the earlier indication in location 1.
The zero may be checked between each location to see that it has not changed. If necessary, the instrument can be zeroed in between each test.
Alternatively, you may also tare the instrument when the load is in location number 1, as this makes it easier to see any difference between locations.
3. Repeatability test
As any instrument, also weighing instruments may suffer from repeatability issues. This means that when the same load is measured several times, the result is not always exactly the same. To find out the repeatability of the instrument, a repeatability test is done.
The repeatability test is performed by replacing the same load on the same place on the load receptor (to avoid any eccentricity error) multiple times. The test should be done in identical and constant conditions and with identical handling.
The load used should be close to the maximum load of the instrument. Often a repeatability test is done with one load only, but it can be done also with several different load values separately.
The load does not necessarily need to be a calibrated load, as the aim is to find out the repeatability. If possible, the load used should be a single load (not several small loads).
A repeatability test is normally done by repeating the measurement at least 5 times in a row. For instruments with a high range (over 100 kg / 220 lbs), it should be done at least 3 times.
In the repeatability test, the instrument is first zeroed, then the load is placed on the load receptor and indication is recorded once it is stabilized. Then the load is removed and zero indication is checked and zeroed if necessary. Then the load is placed again, and so on.
For a multi-range instrument, a load close but below the first range max is often sufficient.
4. Weighing test
The purpose of the weighing test is to test the accuracy (calibrate) of the weighing instrument throughout its whole range in several steps, with increasing and decreasing weight.
The most common practice is the following: start with zeroing the instrument without any load. Set loads of the first test point, wait for stabilization and record the indication. Continue increasing the loads through all the increasing test points. Once the maximum load is recorded, start decreasing the loads through the decreasing test points.
In some cases, the weighing instrument may be calibrated with increasing loads only or decreasing loads only. Typically, 5 to 10 different loads (test points) are used. The highest load should be close to the maximum of the instrument. The smallest test load can be 10% of the maximum load, or the smallest weight normally used.
Generally, the test points are selected so that they are equally distributed throughout the range. More test points can be used for the typical range of usage of the instrument.
With multi-range instruments, each range is to be calibrated separately.
Linearity
In a weighing test, using multiple points through the measurement range of the instrument helps to reveal any issues with linearity. Linearity issues mean that the instrument does not measure equally accurately throughout the range. Even the zero and full span are correct, there may be errors in the middle of the range, which is referred to as linearity errors, or unlinearity (or nonlinearity).
The below picture is a general illustration of nonlinearity. Even instrument’s zero and full range are adjusted correctly, there is an error in the midrange due to nonlinearity of the instrument:
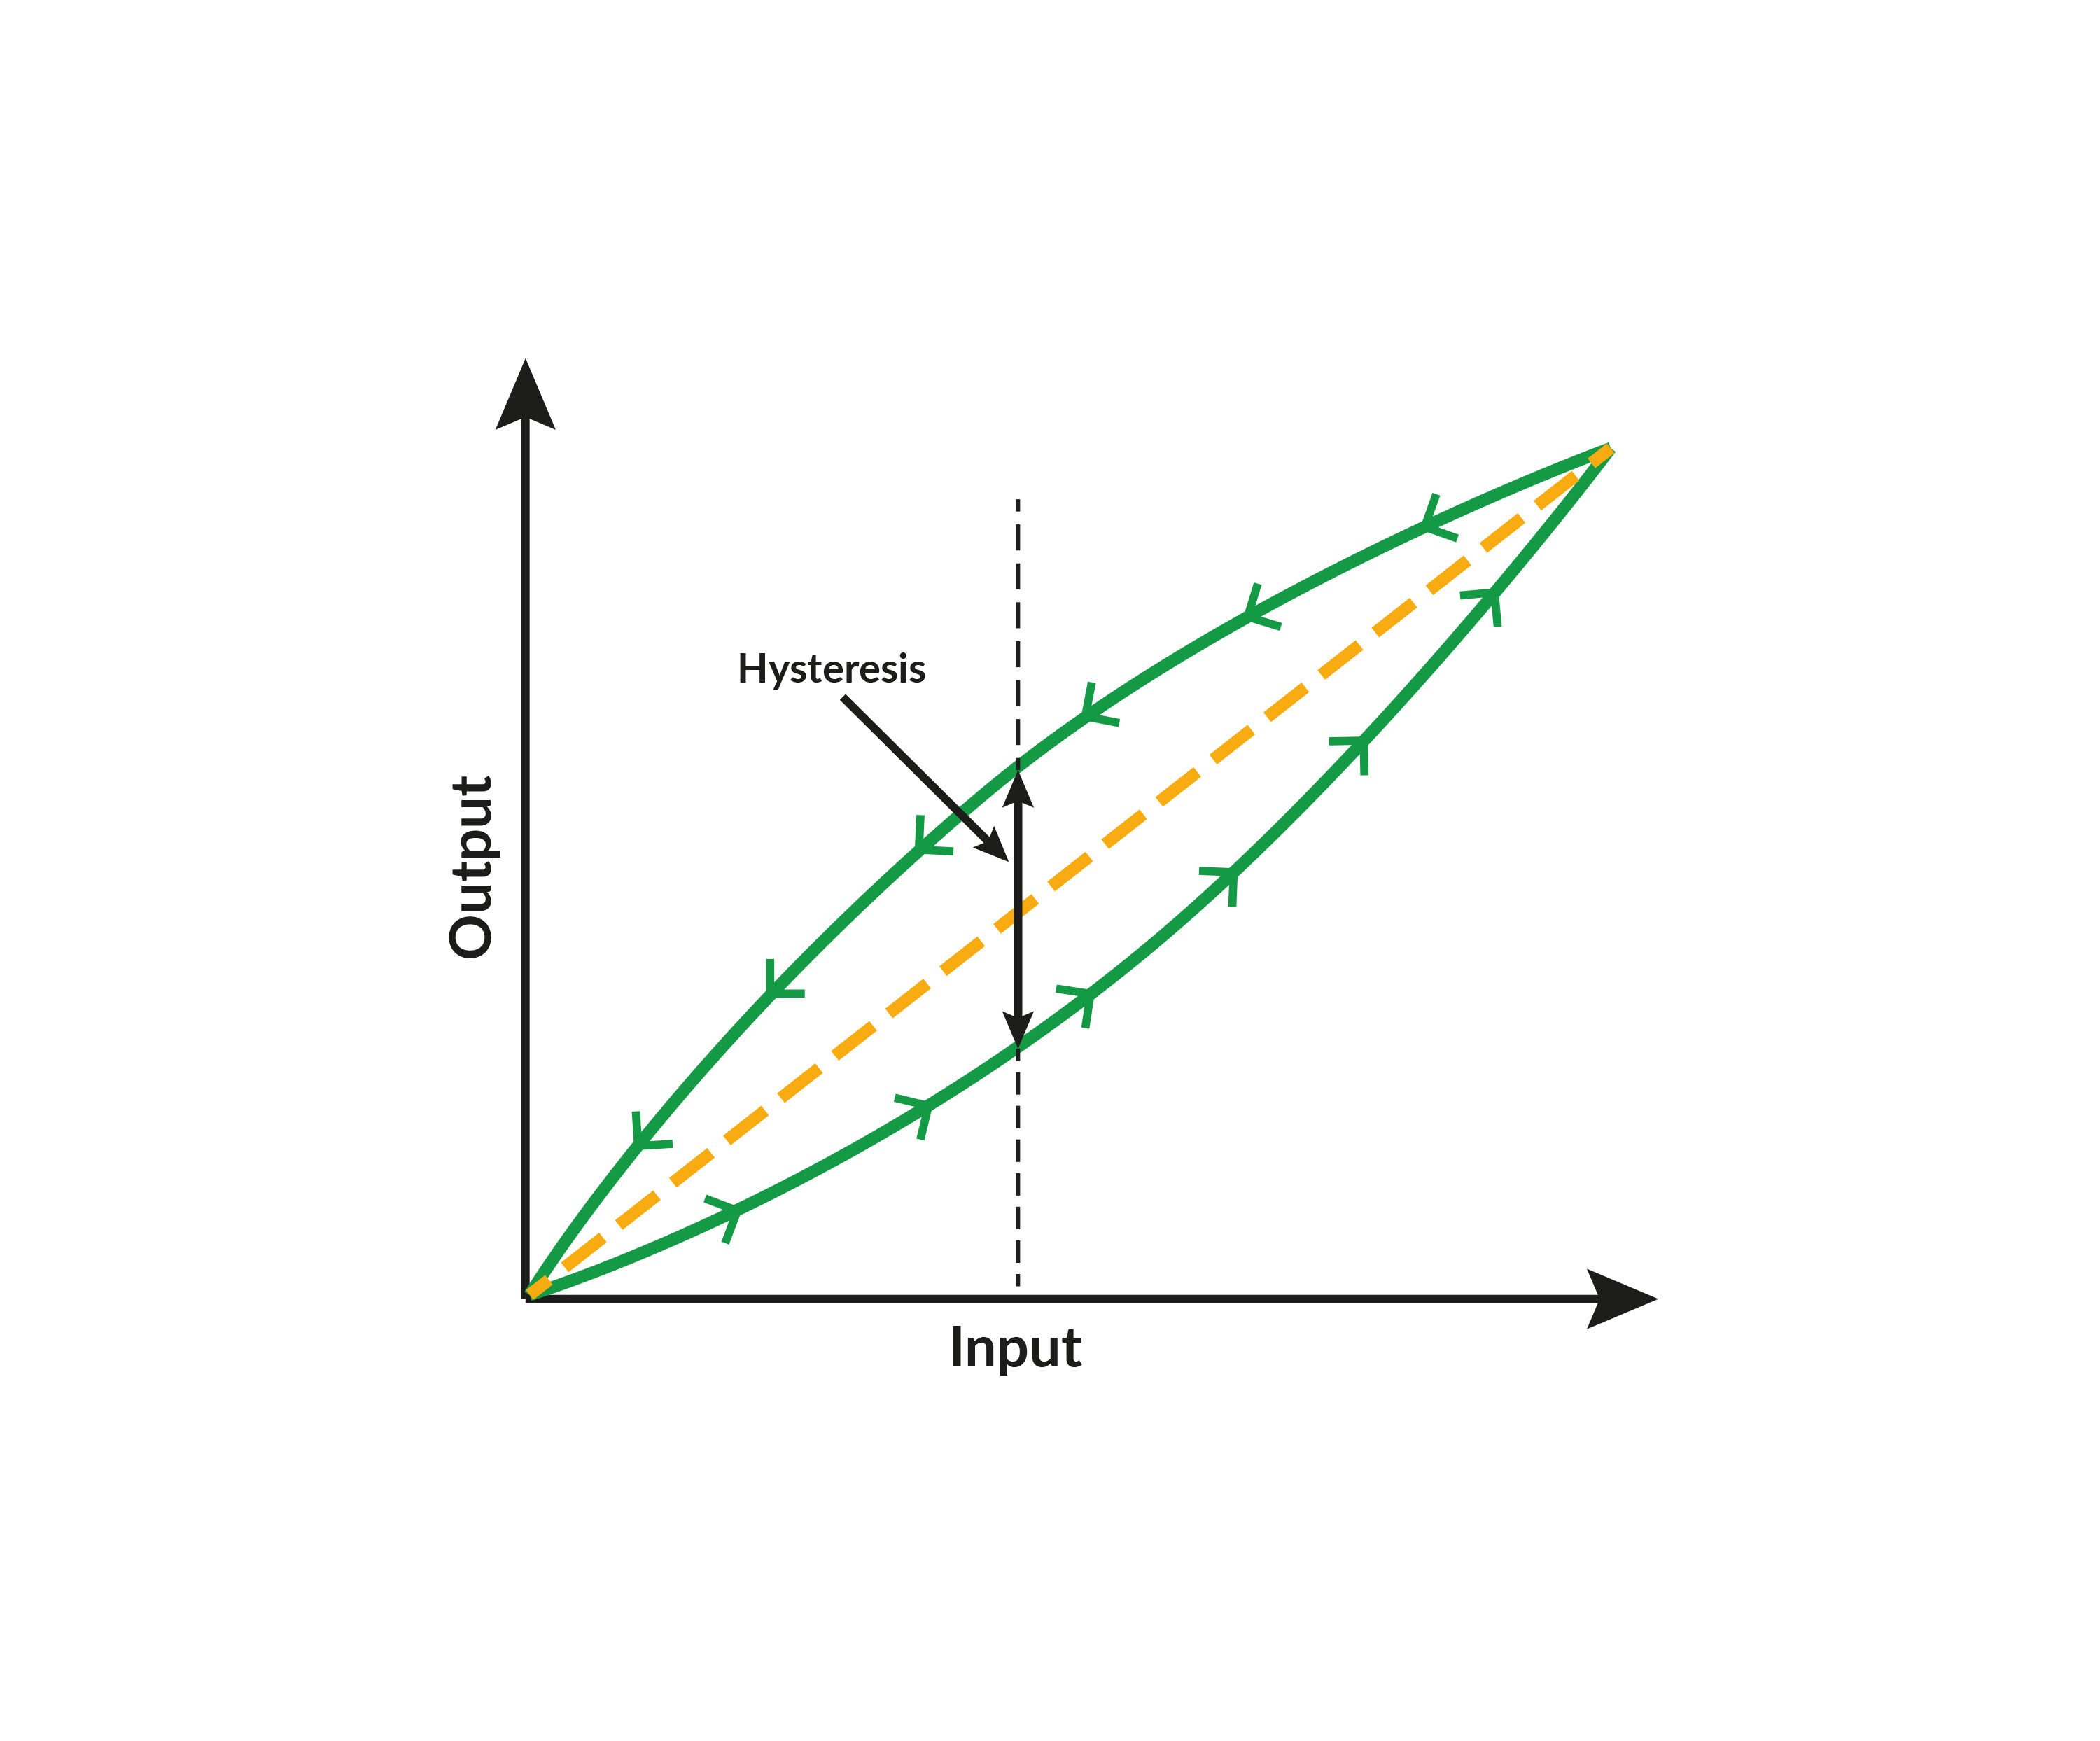
Hysteresis
Hysteresis is the difference in the indication when a test point is approached with increasing or decreasing weight. To find out any hysteresis issues in the instrument, you need to calibrate with increasing and decreasing points.
In a weighing test, when increasing or decreasing the load, it is important not to overshoot or undershoot. This means that when you increase the load, you must approach each test point with increasing weight. You should not add too much weight and then remove it, because then you lose the hysteresis information.
Likewise, with decreasing points, make sure that you approach each point with decreasing weight. Obviously, in order to be able to do this, the usage of the test loads should be well planned in advance.
The picture below is a general illustration of hysteresis. When the instrument is calibrated, the results are different with increasing and decreasing calibration points:
5. Minimum weight test
A minimum weight test is a test that is not always required to be done. This test is anyhow required within some industries, like the pharmaceutical industry.
The purpose of the minimum weight test is to find the smallest load that can be measured while still achieving reliable measurement results and fulfilling the accuracy requirements. When the measured value gets smaller, typically the relative error of the reading becomes higher. The weighing instrument should not be used to measure any loads smaller than the minimum load.
For the minimum weight test, the two main standards have a different approach. Let’s take a quick look at those:
The US Pharmacopeia (Chapter 41)
- After the recent changes in the standard, it does not refer to a minimum weigh test anymore, this has been replaced by the requirement to determinate the instrument’s minimum operating range by finding the point where the instrument’s repeatability (2 times the standard deviation) is 0.10% of reading.
In practice, in some cases, the standard deviation can be very small, but the minimum weight to be measured should anyhow not be smaller than 820 times the actual scale interval (d).
EURAMET Calibration Guide 18 (Appendix G)
- Has the principle that you calculate the measurement uncertainty for each calibration point and the smallest usable load is the point where the uncertainty is still small enough for the requirements for the instrument.
6. Other tests
There are also some other tests specified in the standards, although these are typically not done during a normal calibration, but can be done as a type of approval test or in the initial verification.
Example of these tests are:
- Tare test
- Discrimination test
- Variation of indication over time
- Test of magnetic interaction
Additional topics in the related white paper
To avoid this blog post coming way too long, please download the related white paper to read more on this subject. The white paper discusses the following additional subjects:
Weights
- Handling of weights
- Nominal mass / Conventional mass
- Calibration of weights
- Local gravity
- Air buoyancy
- Effect of convection
- Substitution load
Calibration certificate
- What information should the calibration certificate include.
Uncertainty
- What kind of things will cause uncertainty in the calibration of weighing instruments?
Instrument classes, Tolerance classes, Max permissible error
To download the related free white paper, please click the picture below:
Related Beamex products
Among a lot of other functionality, the Beamex CMX Calibration Management Software has a dedicated functionality for the calibration of weighing instruments. It has been around for more than 10 years already. CMX supports various tests such as: Eccentricity Test, Repeatability Test, Weighing Tests and Minimum Weighing Test. Both OIML and NIST Handbook (including latest USP 41 updates) accuracy classes are supported. The functionality can be used either with a computer or with a mobile device.
For more information on Beamex CMX and its weighing instrument calibration module, please visit the CMX product page and read the brochure, or contact Beamex.


Related references
The most relevant references for this subject include, but not limited to, the following:
- EURAMET Calibration Guide No. 18, Version 4.0 (11/2015)
- EN 45501:2015 - Metrological aspects of non-automatic weighing instruments
- NIST Handbook 44 (2017 Edition) - Specifications, Tolerances, and Other Technical Requirements for Weighing and Measuring Devices
- U.S. Pharmacopeia Convention "Chapter 41 Balances" (2014) (abbreviation "USP 41" used in blog text)
- EA-4/02 (2013) - Evaluation of the Uncertainty of Measurement in Calibration
- JCGM 100:2008 - Evaluation of measurement data — Guide to the expression of uncertainty in measurement
- JCGM 200:2008 - International vocabulary of metrology — Basic and general concepts and associated terms
- OIML R76-1 - Non-automatic weighing instruments Part 1: Metrological and technical requirements - Tests
- OIML R 111 - OIML R111: Weights of classes E1, E2, F1, F2, M1, M1-2, M2, M2-3 and M3
- DIRECTIVE 2009/23/EC (2009) - Non-automatic weighing instruments


.jpg)


Discussion